
Having a nice screensaver on your Kindle might seem like a difficult thing to do, but it really isn’t. The process itself is quite simple, so you don’t have to pine after all of those beautiful Instagram and Pinterest photos without having one yourself.
The best part is, this takes like 5 minutes once you know what to do, and you can have a full library of designs to switch around from season to season or just based on your moods. None of this requires any technical knowledge, and none of this is against your warranty or Kindle terms of use. So, if you’re ready to take your Kindle personalization to the next level, read on!
Below, you’ll find a full step by step guide with screenshots and all the tips, but if you want a quick answer or just to understand how this even works, here it is:
Kindle doesn’t offer or support custom screensavers officially (no matter what type of Kindle you have). But you can add them yourself by creating a fake book and setting your image as the cover, then leaving that book open as your latest read. Depending on how much time you want to spend on your design, it could take you all of 10 minutes to complete this, so it’s not a long or complicated process either!
What You’ll Need
So, here are some things that you’ll need to do this properly:
- An image or a design. You can create one on Canva, get one from Pinterest, use a photo, whatever works best for you. Personally, I used Canva because you can fine-tune all the details, size, and contrast to make it look really good!
- Calibre, free book software. Trust me on this, I rolled my eyes too and refused to download yet another thing, but honestly, Calibre has become my best buddy. I use it all the time to edit covers onto fanfics (yes, you can do that too, same steps as this essentially), edit my own stories to look more like real books, etc. It’s super fun and easy to use.
- Send to Kindle or USB. To send the “book” you create to your Kindle!
You’ll also need a desktop or laptop device since the Calibre software only has full features there, plus designing an image is infinitely easier with a mouse and keyboard than your finger.
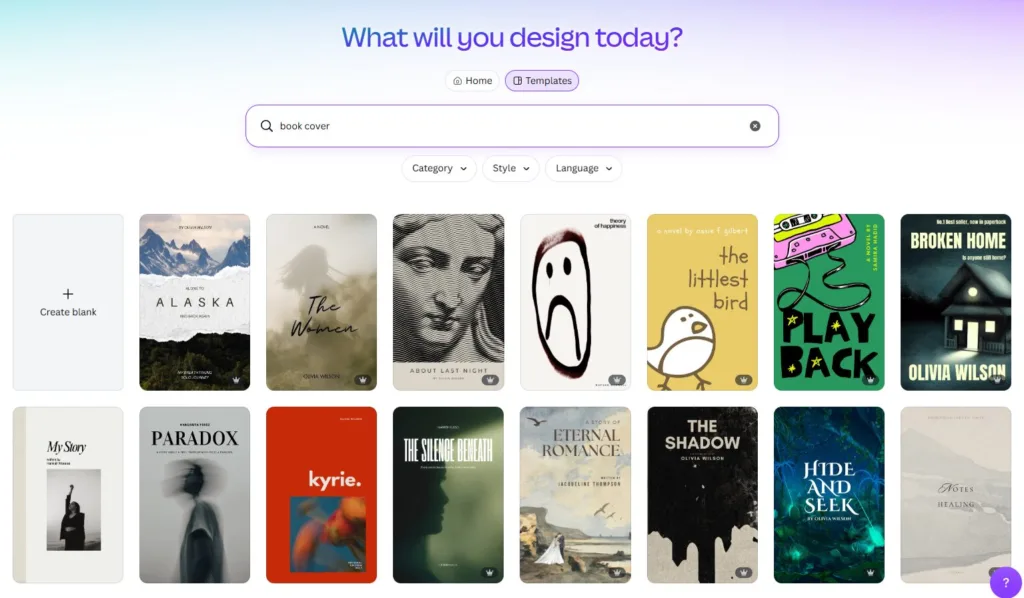
Step 1: Design Your Image
This is the fun part! You get to show your creativity and make your screensaver your own. Here are some basics you need to know first:
Make sure your image has a 3:4 ratio
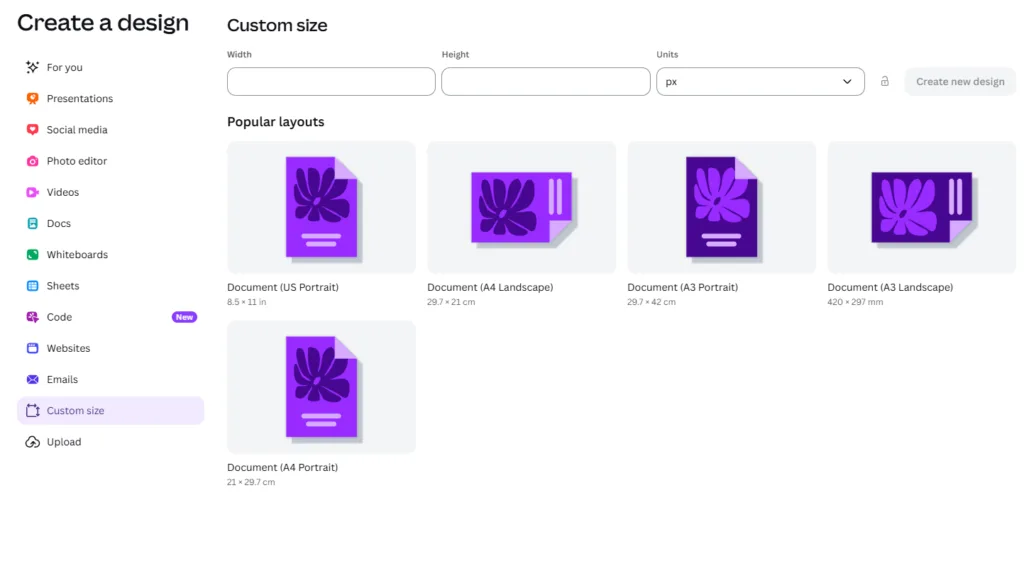
Kindles automatically scale images to fit the screen, so getting the ratio right is more important than getting the size right. You can also check the exact pixel size of your Kindle (this can vary by type and generation), but just getting the ratio correct is enough.
Contrast is more important than color
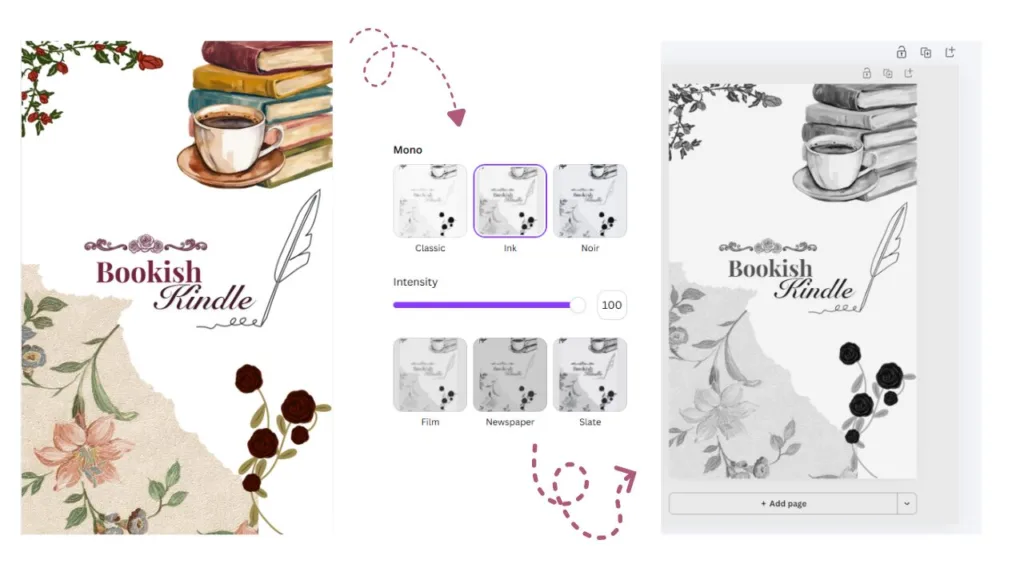
Since e-ink screens are (aside from Colorsoft) black and white, the colors in your image (obviously) won’t display. So, for example, your beautiful soft pastel design can look lovely on your phone but very flat and kind of muggy on your Kindle.
Prevent this by using high contrast between light and dark areas, and using bold shapes and clear lines (avoid soft gradients or shades of a single color). The simpler your design is, the better it will look.
One good way to check whether your image will look good on your Kindle before you send it to Kindle is to grayscale the image. If it still looks good and you’re satisfied, it will translate well to an e-ink screen. But make sure you still download the image in color!
Saving it as a JPG or PNG
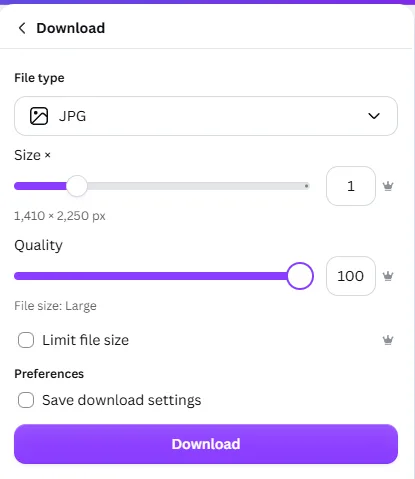
Both formats work, but they’re better suited to different kinds of images:
- JPG is the better choice for photos or anything with lots of color gradients. It compresses well, keeps file sizes small, and Kindle handles it natively without any conversion needed.
- PNG is the better choice for text-heavy designs, illustrations, or anything with flat colors and sharp edges (like a quote graphic or a clean line drawing). It’s lossless, so edges and text stay crisp instead of getting slightly blurry the way JPG compression can cause.
One way or another, avoid PNGs with transparency. E-ink doesn’t render transparent backgrounds properly, so a transparent area will usually just default to white or black instead of showing through as intended. Flatten your design onto a solid background before saving.
Add a few more pages to your book + Save as PDF
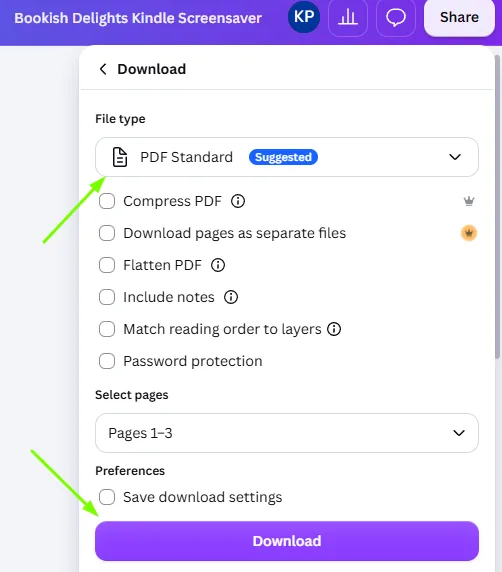
I know that there’s an option on Calibre to just add an empty ebook, but I found that it doesn’t quite work. It doesn’t actually create an ebook, it just saves your cover as a JPEG, and once you send it over to your Kindle, it doesn’t work.
So, what you have to do once you download your newly designed screensaver is to add a few more blank pages to your design (one or two will do), and then download it again as a PDF.
Step 2: Adjusting Everything in Calibre
Install Calibre (it’s free)
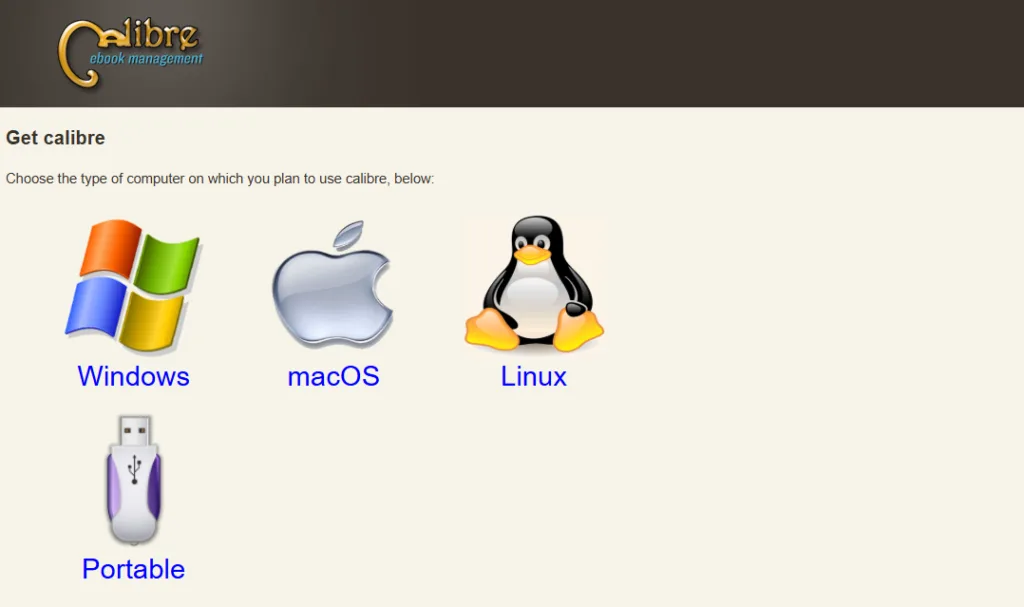
Calibre is a free ebook management tool, and it’s the easiest way to do this. When I first learned I would have to download software to my desktop to do this, I almost gave up. I just don’t want yet another thing.
But let me tell you, I’m so glad I have it. I use it all the time now to add covers to fanfics I read before I send them to my Kindle, to add covers to my own stories or polish them up more, and more. It’s a legitimate app that works so well.
So, just head to calibre-ebook.com, download the version for your operating system (Windows, Mac, or Linux), and run the installer. The whole process takes a couple of minutes, and you won’t need to touch most of Calibre’s other features for this, just the two or three we’re about to use.
Adding your PDF to Calibre, Conversion and More
1. Open Calibre and click Add books in the top toolbar.
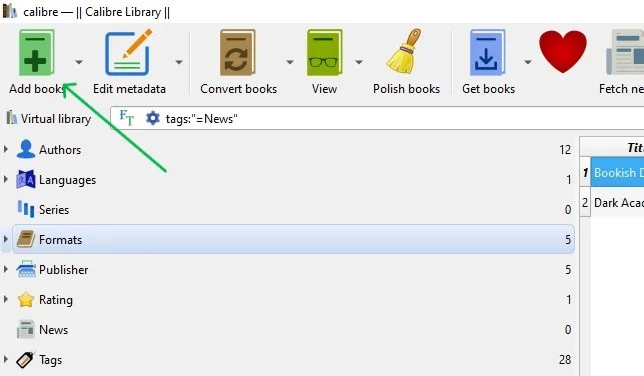
2. Choose your newly downloaded PDF and add it to the Calibre library.
3. Convert to EPUB. Just click on the “Convert Book” option and remember to switch from AZW3 format to EPUB.
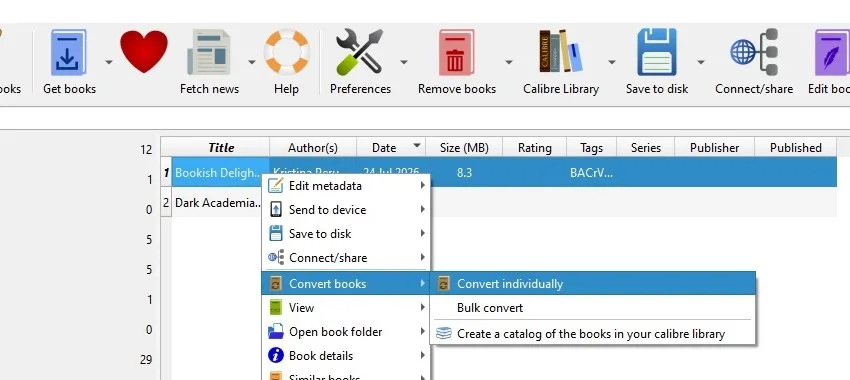
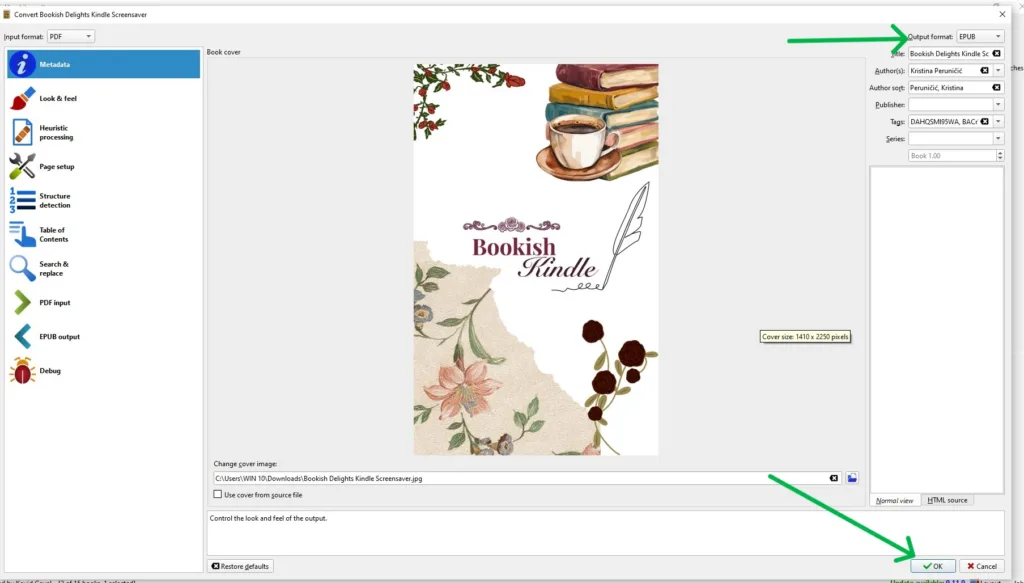
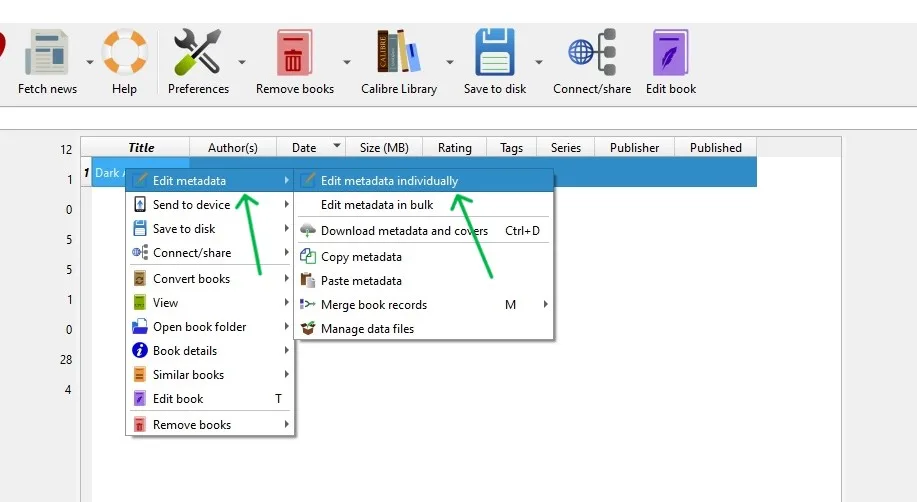
4. Once your book is converted, right-click it in the library and choose Edit metadata → Edit metadata individually.
5. In the metadata window, find the cover preview on the right side and click Browse.
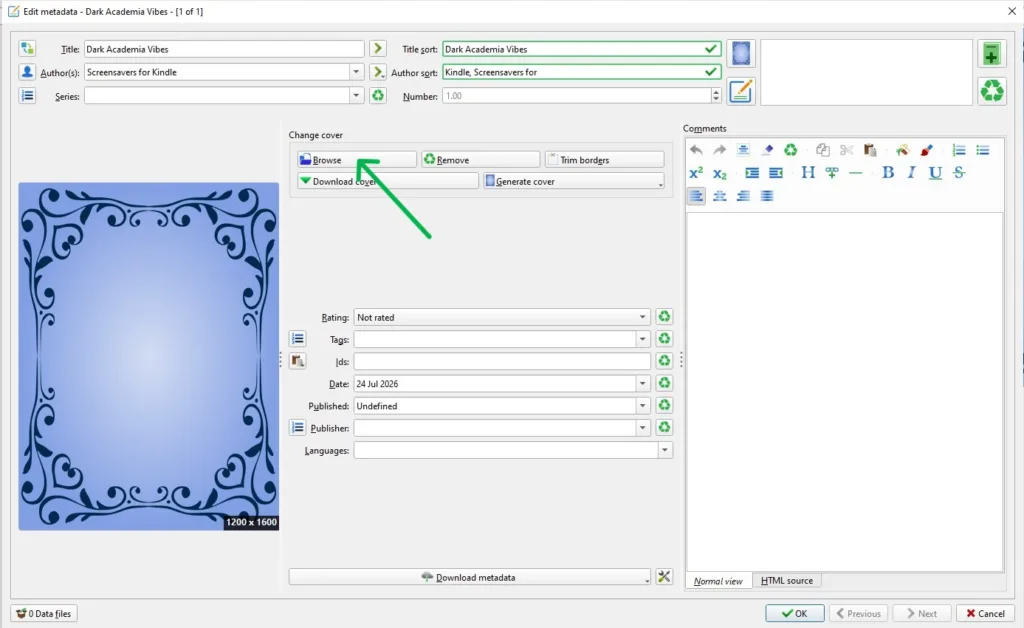
6. Select the image you designed and saved earlier (your JPG or PNG), then click OK to save it as the book’s cover. Sometimes, it’ll already be there, but just in case, I like to add the JPG separately as well.
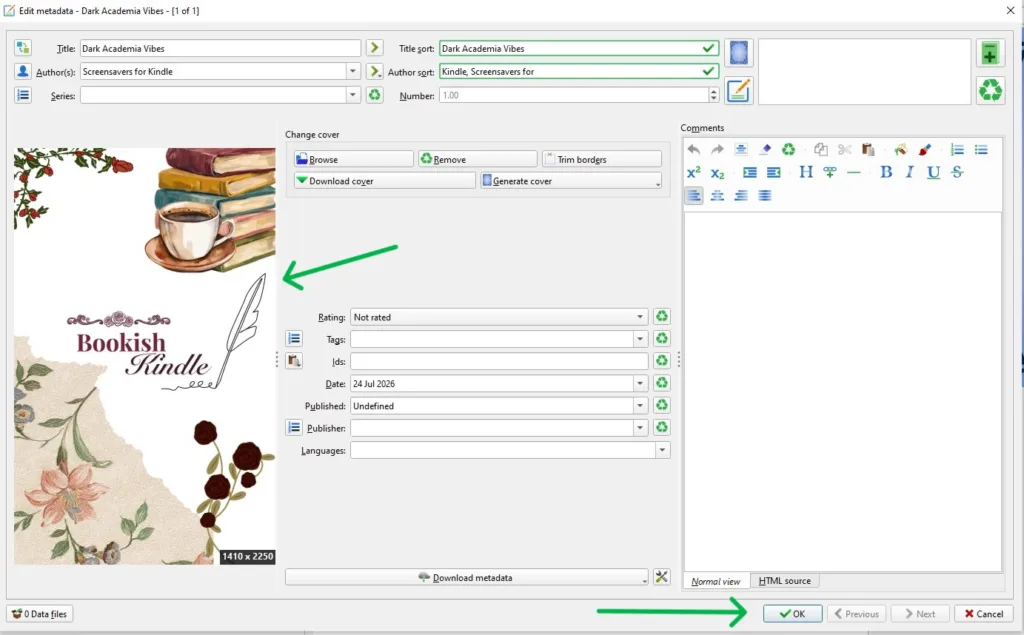
7. Set the “author” field to something easily recognizable. For example “Screensaver”. This is especially useful if you plan on creating multiple, because you’ll be able to find and sort them easier later in your Kindle device.
8. Set the “title” field to something fun and descriptive. For example, “Summer Floral” or “Autumn Cozy” or whatever you want, really. This will make it easier for you to find different covers later in your Kindle.
9. Save to disk as an epub file!
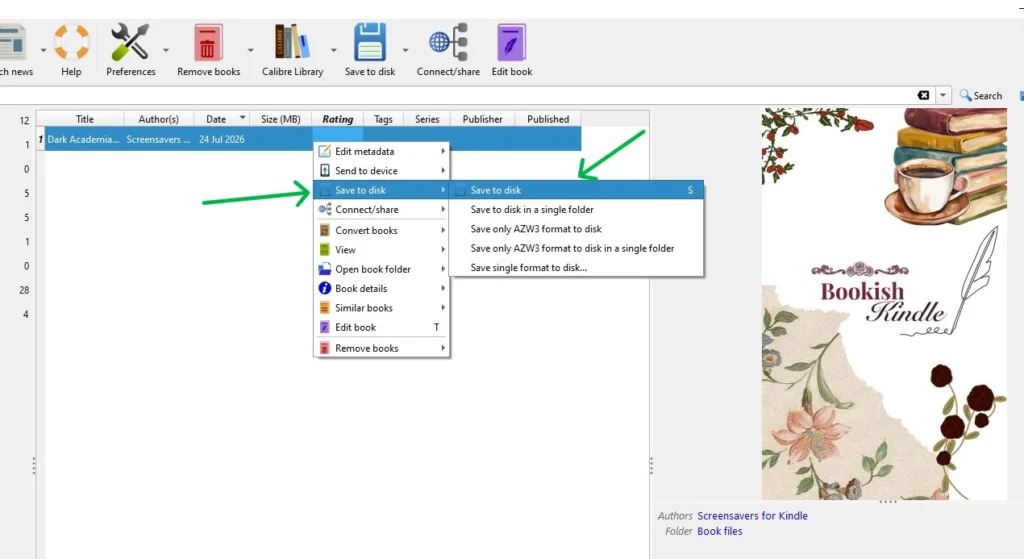
Okay, so, this is essentially all you need to do most of the time and usually you can just skip to the next step.
However, Kindles have a tendency not to display book covers of pdfs and epub files unless these are “hardcoded” into the meta data of the book. I found this out the hard way, when I couldn’t get my own screensaver to show up. I almost gave up here, because it just wouldn’t work.
But don’t worry, the solution is actually really simple.
Calibre has a setting called “Polish Books” which will do this hardcoding for you. It’s a bit trickier to find, though, because it’s not always displayed in the main toolbar. I had to find it and add it there myself.
Here’s how to do it:
1. In the main toolbar, you’ll see the option called “Preferences” — click on the little arrow to see its dropdown menu.
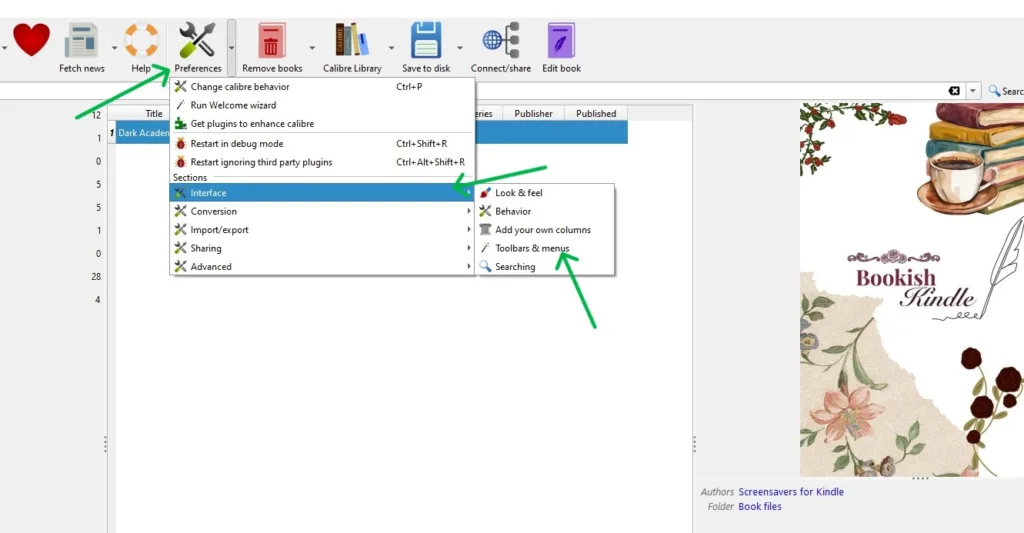
2. In the dropdown menu, choose the option called “Interface” and its little side menu will show up, with options.
3. In these options, choose the “Toolbars and Menus”. It should show the menu-editing interface like in the image below.
4. You have to choose the menu you want to edit. Pick the option called “The Main Toolbar”.
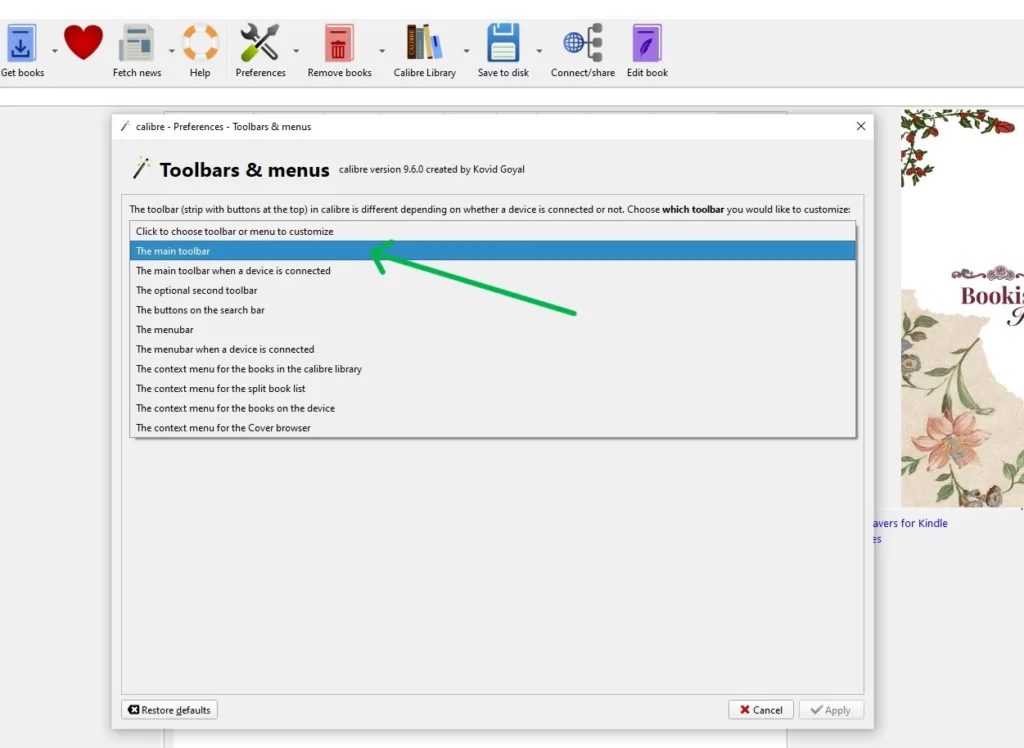
5. You should now see something like the image below. In the first box called “Available Tools”, find “Polish Books”. It should be easy to spot since it has a broomstick icon.
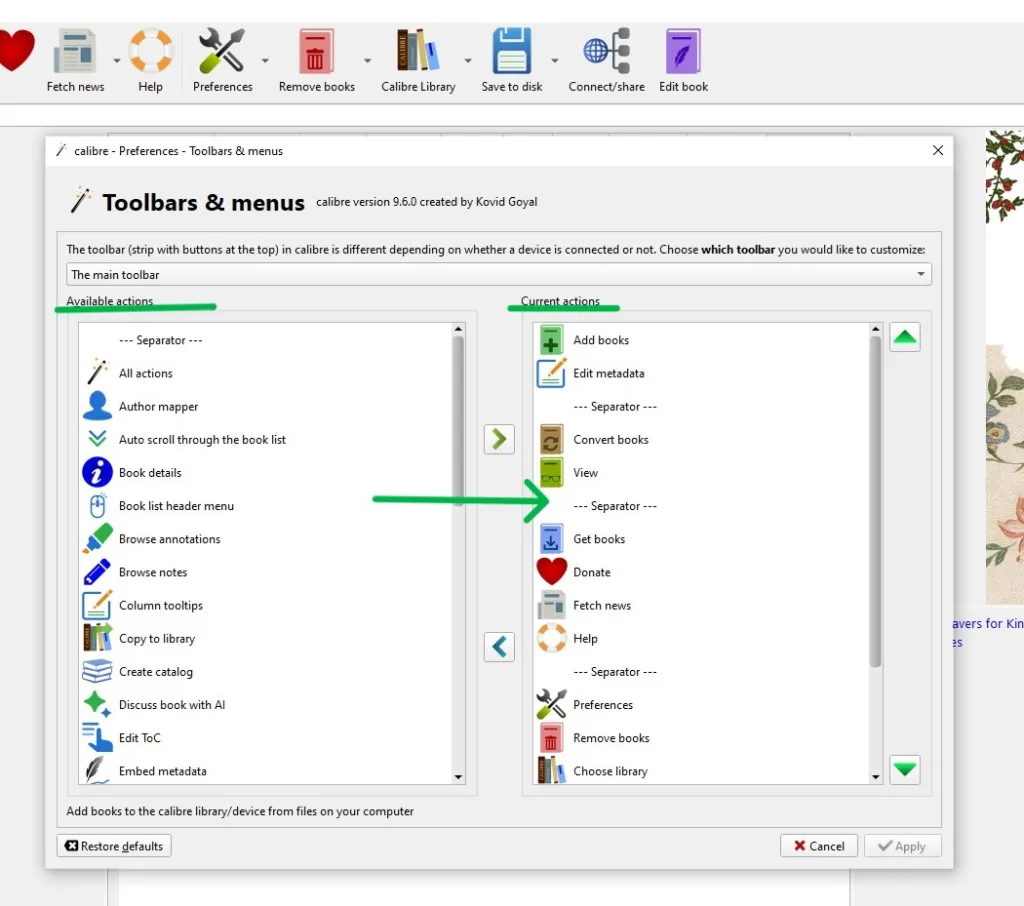
6. Found it! Now, all you have to do is click on the little arrow that moves it to your main toolbar.
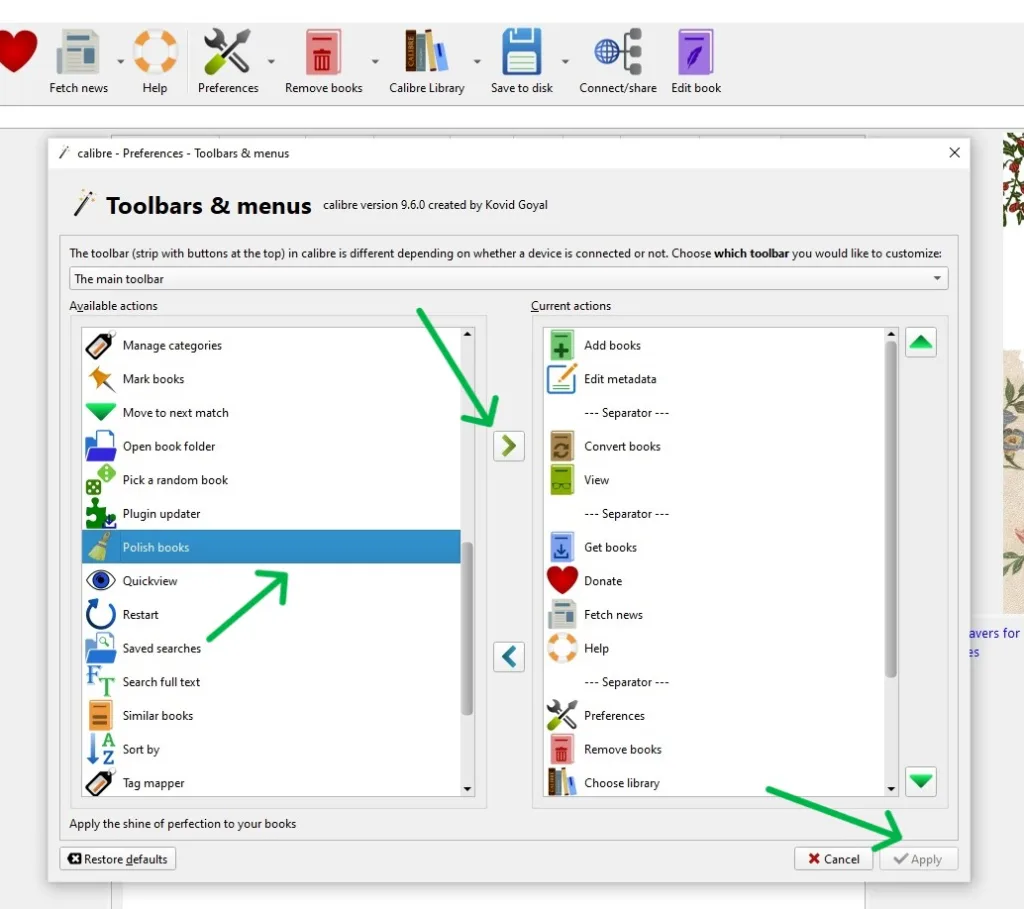
7. Before you click save, I would also recommend moving it somewhere you can easily spot it. Just select it and use the “up” arrow to move it around.
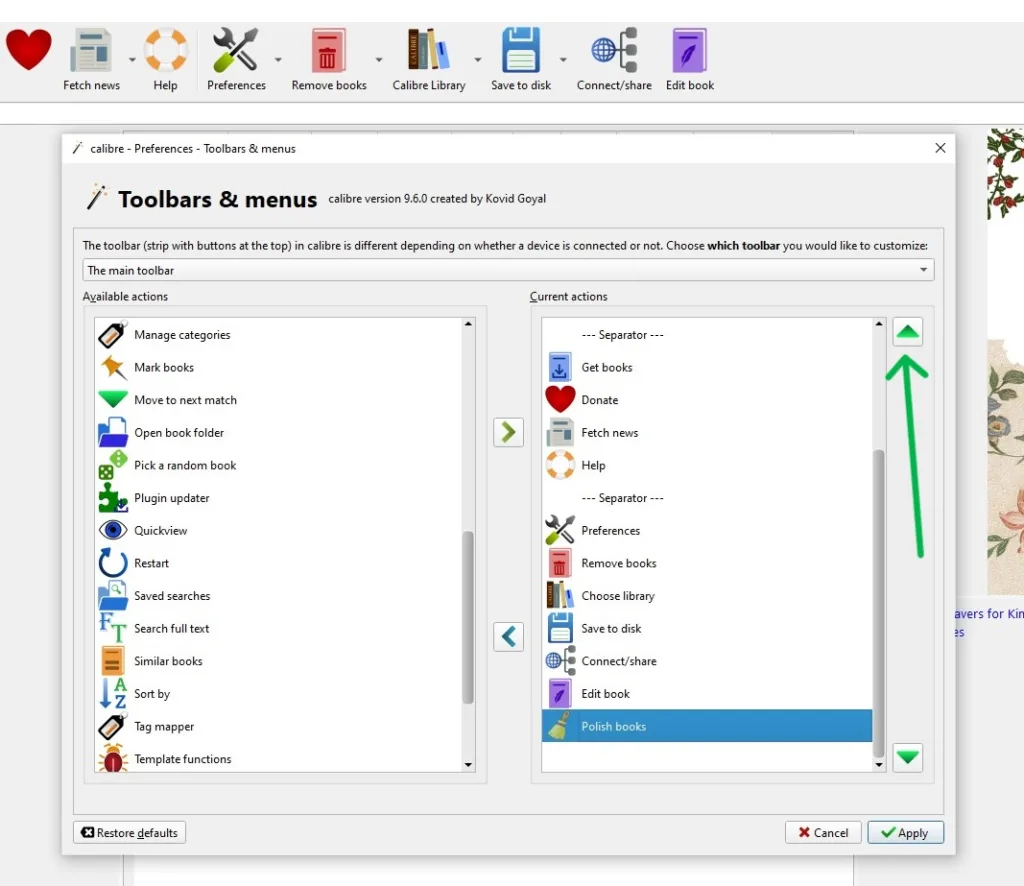
8. Click “Apply” and that’s it, now you have the “Polish Books” feature in your main toolbar!
Now that you finished that, all you have to do is:
1. Find your “book” and select it (click on it).
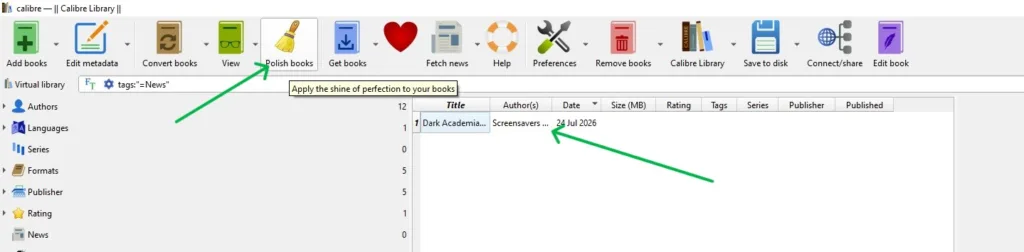
3. Click on “Polish Books”. It will show you this window. Just select the settings as I’ve shown them below. The most important one, of course, is “Update the cover in book files”.
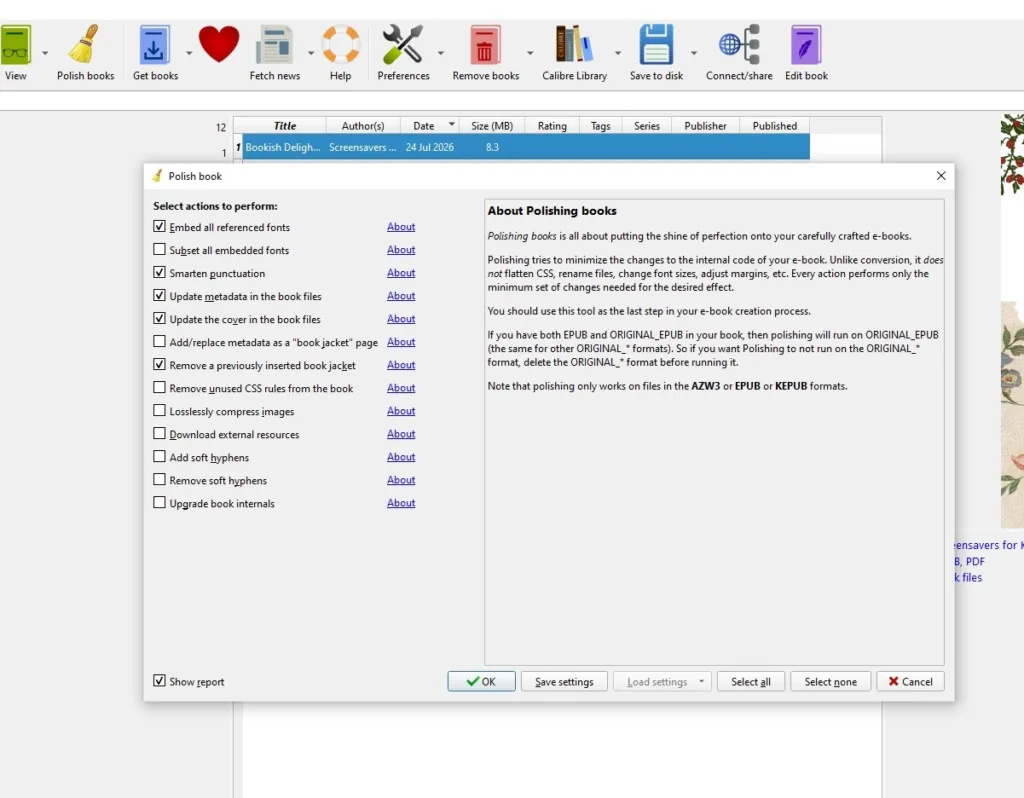
4. And done! Wait for it to finish polishing and then you can just save the book to disk!
I know this is probably more work than you wanted to do, but now that you have Calibre and “Polish Books” is set up well, the next time will take you like three seconds to do. Plus, if you read fanfiction, you can use this same (or similar) process to add covers to your fanfic epub files and have them displayed on your kindle (when you send them to kindle).
Of course, if you get your books from other places that sell ebooks as epub files, I believe you can use this process to set a cover that you like instead of being stuck with the one they give you. So, for example, you could get the really pretty hardback covers instead of the usually average ebook edition covers (just download whatever cover you like from Goodreads).
Step 3: Send It to Your Kindle
If you’ve never sent anything to your Kindle before, it’ll be good for you to know that this part is actually so simple. You have two options, though:
1. Use the “Send to Kindle” web page. All you have to do is “Select Files from Device” and then click send and wait for your book to show up on your Kindle.
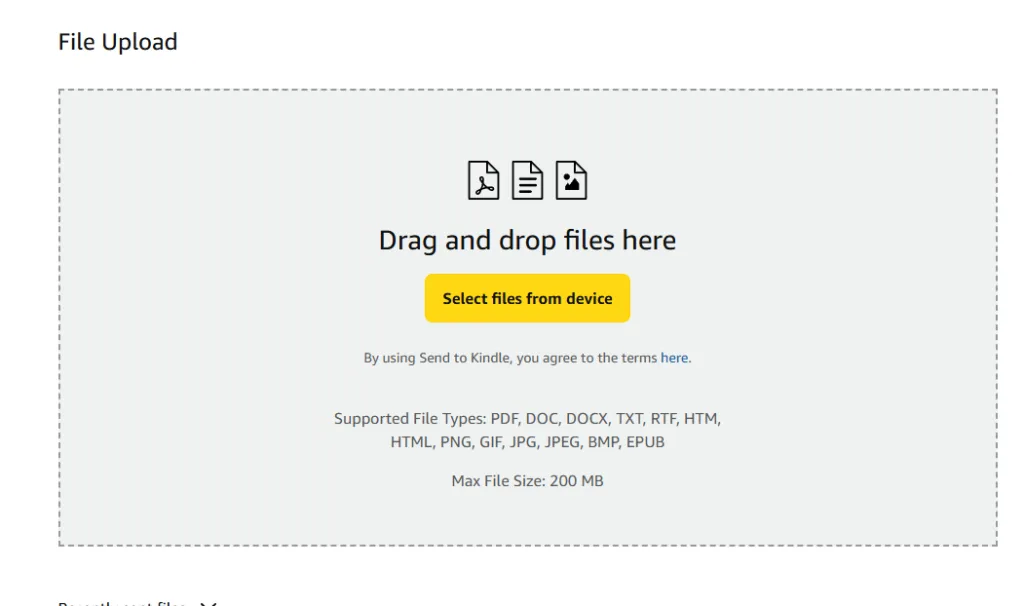
2. USB transfer directly to your documents folder. And yes, you can actually USB things from your PC/laptop to your Kindle easily, just drag and drop!
Choose whichever one of these options suits you best. If you “Send to Kindle” just be aware that your file will appear on all of your Kindle devices and become available for download on them. If you just USB transfer files, they shouldn’t show up on the other devices.
One of my Kindles is with my mom, so I generally prefer to keep her library clean of any of my personal docs and files, so I tend to use the USB method, but both of these will work equally well.
Step 4: Set It As Your Screensaver
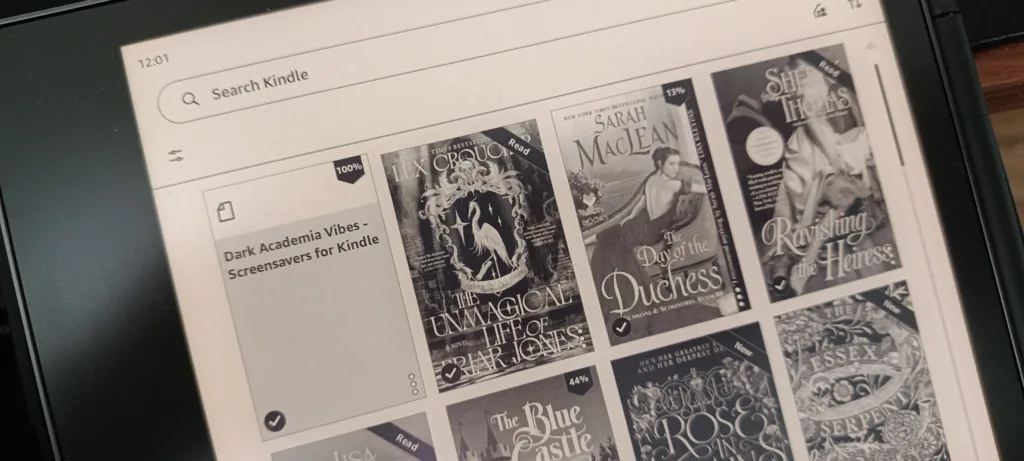
Wait for your book to appear in your library. It might take a few minutes, but it will appear. Once it does, you should tap on it to get it to start downloading, and once it does, all you have to do is open the book, lock the Kindle device, and you’ll be able to see your design on your screen!
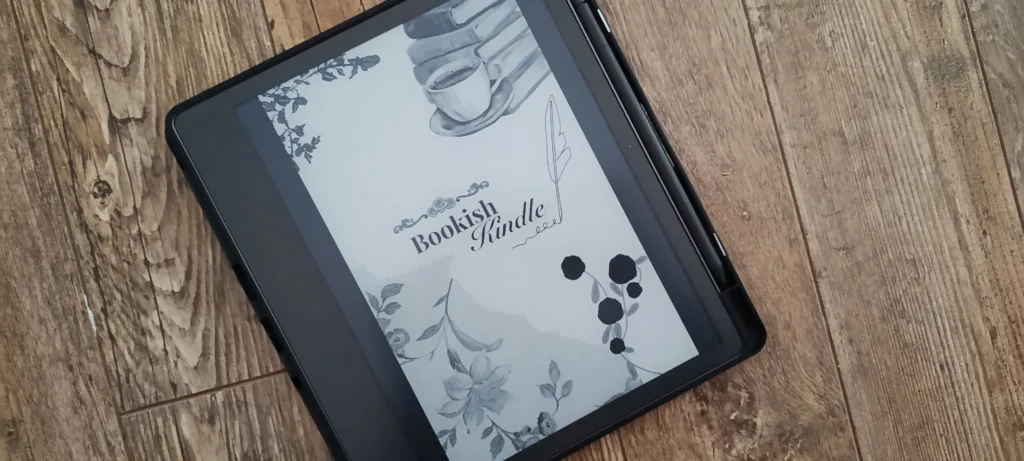
Of course, make sure that “Show covers as screensaver” option is enabled in the display settings. This is possible for almost all Kindle devices, unless your device is older (8th Gen and earlier, Voyage, etc.). The software needs to be up to date, and you need to have the ads option turned off.
It’s also important to note that the screensaver you created won’t always sit there. As soon as you open a new book to read, it will switch to that book cover instead. There is no safe, permanent solution for this that I know of, but it really doesn’t matter.
Every time you want to lock your Kindle for a while, just open your dummy book with your design, and you’ll be set. While you’re actively reading, your screensaver doesn’t matter anyway.
How to Change It Later
Just repeat the same process! You can create a small library of these dummy books with your designs as covers and put it in a collection so you can switch back and forth whenever you feel like it.
Troubleshooting
There are some common issues you can run into, so here’s what they are and how to fix them. Of course, if you run into an issue that isn’t listed below, just drop a comment below and I’ll do my best to help out!
- Image looks washed out or low-contrast. This usually means that you used soft colors and not enough contrast. Pastels, soft pinks, lighter stuff won’t show up as well. If you see that someone has a screensaver that looks like it would be pastel but looks good on Kindle, it most certainly isn’t actually pastel. I recommend that you test things out and grayscale the image before you send it to your Kindle to make sure everything looks good.
- Screensaver reverted to default. This usually means that you opened a different book since or that your book isn’t actually open as the most recent read. Just open it again and you’ll be good.
- File isn’t showing up in your library. Wait a little bit and try to send it again. This happened to me once and it turned out that Amazon was having some server issues so it never sent my file through. Make sure that your file is in the correct format (epub) and that the “send to kindle” page says it’s actually “In your library”.
- Book cover isn’t showing up on your Kindle, it just looks like a random file. Go back to my guide to “Polish Books” settings. This will hardcode the cover into the epub metadata and make sure it actually appears no matter what.
Does this drain the battery?
Nope! It will be just like you’re reading any other book. Kindles don’t go to sleep the same way other devices do and the screen will never be just black. Having a custom screensaver is, to Kindle software itself, the exact same as if you started any other book and didn’t finish yet.
Does this work on Kindle Scribe?
Yes! This works across all Kindle devices, except maybe the older ones or if you didn’t get an ad-free device. Just make sure that you turn off the ads option.
Can I use a photo of myself or my pet?
Yes, you can, just make sure you follow the same process as I showed above, just skip the design step. Make sure that your image is high in contrast, the correct ratio (3:4) and check if it still looks good in grayscale. But other than that, you should be good!
